Let’s actually build the thing
Project Structure
Four files. That is the entire project. Each one plays a distinct, irreplaceable role.
The Makefile
CC = riscv64-unknown-elf-gcc

CFLAGS = \
    -march=rv32i \
    -mabi=ilp32 \
    -nostdlib \
    -ffreestanding

all:
    $(CC) $(CFLAGS) \
        start.S main.c \
        -T linker.ld \
        -o kernel.elf

run:
    qemu-system-riscv32 \
        -machine virt \
        -nographic \
        -bios none \
        -kernel kernel.elf
Dissecting the flags
-march=rv32i — Target the RV32I instruction set. The compiler will only emit instructions from this subset. Using a 64-bit instruction on a 32-bit target would be a hard error.
-mabi=ilp32 — Use the ILP32 calling convention. int, long, and pointers are all 32 bits. This tells the compiler how to pass function arguments and align data.
-nostdlib — Do not link the standard C library (libc) or the default C runtime startup files (crt0.o, crti.o, etc.). We are providing our own startup code in start.S. Without this flag, the linker would try to include glibc or newlib, which expect OS syscalls that don’t exist in our bare-metal world.
-ffreestanding — Inform the compiler that the standard library may not exist and that main() is not necessarily the entry point. It also allows the compiler to use built-in optimised versions of memory operations (memcpy, etc.) without assuming the real library functions are available. Together with -nostdlib, this puts GCC into fully “no assumptions” mode.
-T linker.ld — Use our custom linker script instead of the default one. This is what makes the code land at 0x80000000.
The run target launches QEMU with the compiled ELF. The -nographic flag is what routes the UART output to your terminal — QEMU maps the 16550A’s output to stdout when there is no display.
start.S — The Assembly Entry Point
.section .text
.global _start

_start:
    la sp, stack_top
    call main

1:
    j 1b
This is the smallest possible valid entry point for a bare-metal C program. Let’s trace through it instruction by instruction.
.section .text — Place the following code in the .text section (executable code). The linker script will map .text to 0x80000000, so the assembler knows this code will be at the start of RAM.
.global _start — Export the _start symbol so the linker can find it. The ENTRY(_start) directive in the linker script looks for this symbol to determine the program’s entry point — the address the CPU should jump to after reset.
la sp, stack_top — la is “load address.” This instruction loads the address of stack_top into register sp (the stack pointer, x2). stack_top is a symbol defined at the end of the linker script — it sits 4096 bytes above the end of .bss, giving us a 4 KB stack. This is the single most important line in the entire project: without a valid stack pointer, no C function can safely execute.
call main — Jump to the C main() function and store the return address in ra. The call pseudo-instruction expands to auipc ra, offset_hi; jalr ra, ra, offset_lo. When main() eventually returns (in theory), execution resumes at the instruction after call main.
1: j 1b — This is an infinite loop. 1: is a local label. j 1b means “jump backwards to label 1.” If main() ever returns (ours has while(1) so it never does), the CPU spins here forever rather than executing random memory. This is the bare-metal equivalent of while(1); at the assembly level — a safe halt when there is nothing else to do.
linker.ld — Describing Memory to the Linker
ENTRY(_start)

MEMORY
{
    RAM (rwx) : ORIGIN = 0x80000000, LENGTH = 128M
}

SECTIONS
{
    .text : {
        *(.text*)
    } > RAM

    .rodata : {
        *(.rodata*)
    } > RAM

    .data : {
        *(.data*)
    } > RAM

    .bss : {
        *(.bss*)
    } > RAM

    . = ALIGN(16);
    . += 4096;
    stack_top = .;
}
ENTRY(_start) — Sets the ELF entry point to the _start symbol. QEMU reads this from the ELF header to know where to set the PC after loading.
MEMORY { RAM (rwx) : ORIGIN = 0x80000000, LENGTH = 128M } — Declares a single memory region called RAM. It starts at 0x80000000 (where QEMU’s virt machine maps RAM), it’s 128 MB large, and it has read, write, and execute permissions (rwx). Everything — code, data, and stack — goes into this one region. A real project might have separate FLASH and RAM regions.
SECTIONS { ... } — The sections block controls where each output section lands.
The *(.text*) syntax means “collect the .text section (and any subsection like .text.unlikely) from every object file (*).” This glob-style matching is how you pull together object files compiled from multiple .c and .S files.
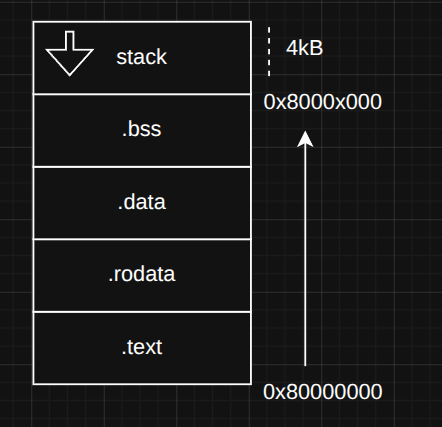
The sections are placed in this order:
.text— code first, starting at0x80000000.rodata— read-only data (string literals) immediately after.data— initialised variables.bss— zero-initialised variables
After all sections, three linker expressions carve out the stack:
. = ALIGN(16); — The dot (.) is the location counter — the current address as the linker fills in sections. ALIGN(16) rounds it up to the next 16-byte boundary. Stack frames on RISC-V must be 16-byte aligned per the ABI.
. += 4096; — Reserve 4096 bytes (4 KB) for the stack. The linker advances the location counter by 4096 without putting anything there — it just leaves room in the memory map.
stack_top = .; — Assign the symbol stack_top to the current location counter value. This is what start.S uses in la sp, stack_top. The stack grows downward from this address, into the 4096-byte region below it.
main.c — The C Program
#define UART0 0x10000000L

volatile unsigned char *uart =
    (volatile unsigned char*) UART0;

void putc(char c)
{
    *uart = c;
}

void puts(char *s)
{
    while (*s)
    {
        putc(*s++);
    }
}

int main()
{
    puts("Hello RISC-V!\n");
    while (1);
}
#define UART0 0x10000000L — The base address of QEMU’s 16550A UART in the virt machine’s memory map. The L suffix makes it a long literal, which avoids potential integer promotion issues on 32-bit platforms when casting to a pointer.
volatile unsigned char *uart — A pointer to a single byte at the UART’s base address. unsigned char is ideal for hardware registers: it is exactly 1 byte, unsigned (no sign-extension surprises), and the compiler won’t add padding. The volatile qualifier ensures every read and write generates a real memory instruction — the compiler cannot cache or reorder these accesses.
putc(char c) — Writes a single character to the UART by storing it at the address uart points to. On QEMU’s virt machine, writing to 0x10000000 causes the character to appear on your terminal. That’s the entire function — one line.
puts(char *s) — Walks a null-terminated string calling putc for each character. The condition while (*s) is true for any non-zero byte and false when the null terminator \0 is reached. *s++ dereferences the current character and advances the pointer in one expression.
Note that this puts differs from the standard library’s puts: the standard version appends a newline; ours does not (the newline is already in the string literal "Hello RISC-V!\n").
main() — Calls puts once, then spins in while (1). In a bare-metal environment, main() must never return (or if it does, the entry point’s infinite loop catches it). There is no OS waiting to clean up after us — returning from main() would be jumping to an undefined return address.
Running It
Prerequisites
Install on Ubuntu/Debian:
sudo apt install gcc-riscv64-unknown-elf qemu-system-misc
Build and run
make        # Builds kernel.elf
make run    # Launches QEMU
To exit QEMU, press Ctrl+A, then X.
Inspect the ELF (optional but educational)
# View section layout and sizes
riscv64-unknown-elf-size kernel.elf

# See the entry point and section headers
riscv64-unknown-elf-objdump -h kernel.elf

# Disassemble — see the actual RISC-V instructions
riscv64-unknown-elf-objdump -d kernel.elf

# See all symbols and their addresses
riscv64-unknown-elf-nm kernel.elf
What You Should See
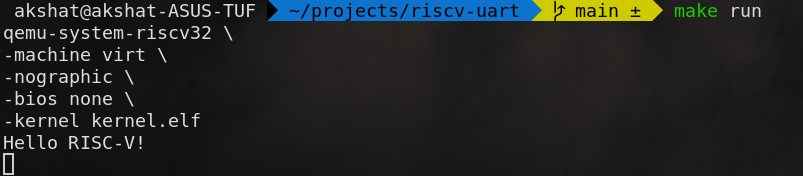
After make run, your terminal should immediately display:
Github Repo: https://github.com/AkshatSharma05/riscv-uart
Going Further
There’s a lot more to explore now that the basics work. Next, I want to experiment with input and output, see how memory really behaves, try some timing and interrupts, and eventually test this on actual hardware.